How to Set Up a Shop on Instagram A Complete Guide for 2026
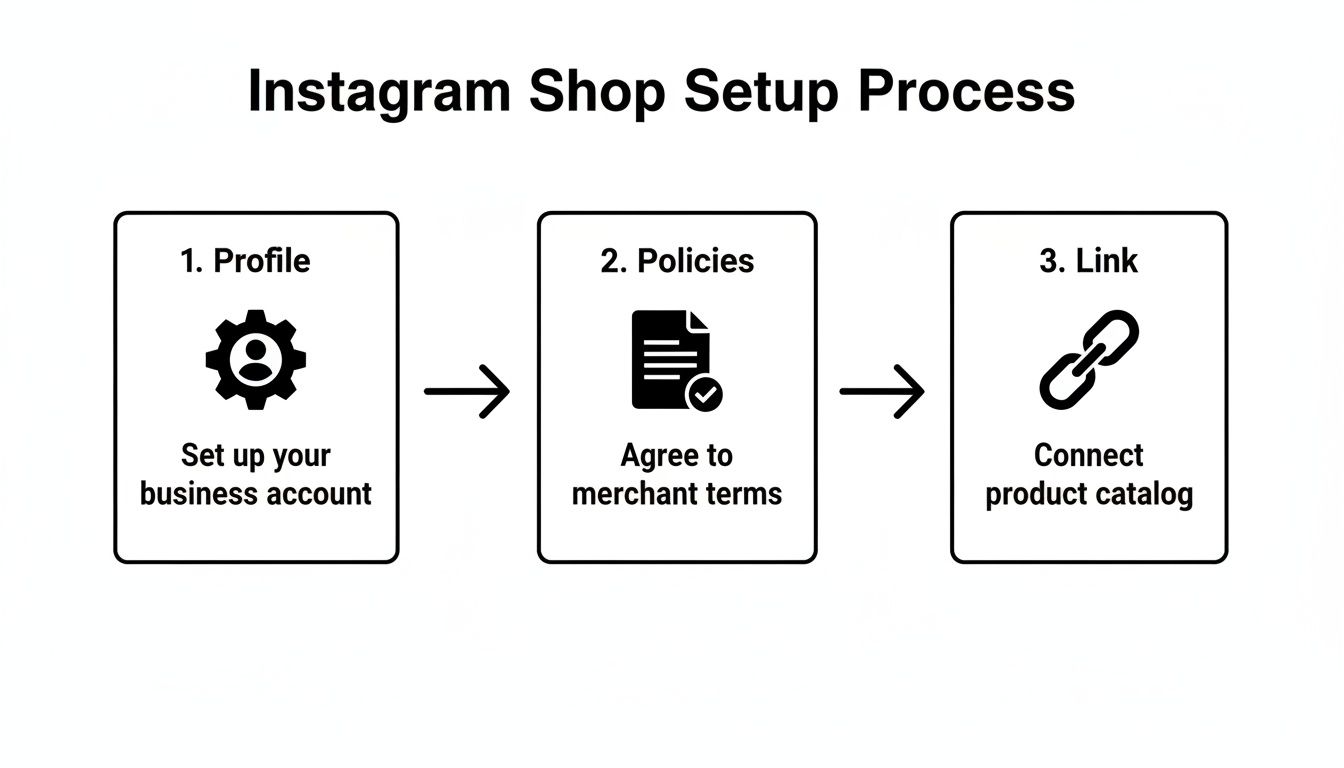
Alright, let's get your Instagram Shop set up. Before you can start tagging products and turning your feed into a sales machine, you have to get the foundational pieces in place.
Think of it as setting up a physical retail space. You can't just throw products on a shelf; you need to have the right business licenses, a lease, and a way to process payments. Getting these digital equivalents right from the start is the difference between a smooth launch and weeks of frustrating delays.
Getting Your Ducks in a Row for Instagram Commerce
The whole process is about connecting your business assets within the Meta ecosystem so everything communicates properly. Let's walk through what that looks like.
First, your standard Instagram profile won't cut it. You need to switch to a Professional Account. This is what unlocks all the business tools you'll need, including Insights and, most importantly, the shopping features.
When you make the switch, you'll see two options: "Business" or "Creator." For anyone selling physical goods, the Business account is the only way to go. It's built to connect directly to Meta's commerce backend.
Nail Down Your Eligibility and Policies
With a Professional Account ready, you have to make sure your business and products are actually eligible. This trips up a lot of brands.
Meta has strict Commerce Policies that spell out exactly what you can and can't sell. Generally, services, digital downloads, animals, and other regulated goods are off-limits. You need to review these policies carefully. If your catalog includes even one item that violates the rules, your entire shop submission will likely get rejected.
I’ve seen this happen with subscription boxes that mix physical items with digital guides, or with brands that sell regulated products like CBD. The key is to ensure your entire catalog is made up of eligible, physical products.
My advice? Don't just skim the Commerce Policies. A thorough review before you even start can save you from a huge headache and weeks of back-and-forth with Meta support trying to fix a rejection.
Connect Your Facebook and Instagram Assets
Instagram Shopping isn't a standalone feature; it's deeply tied to Facebook. You absolutely must link your Instagram Business Account to a Facebook Page. This connection is the bridge that lets you use Commerce Manager—the command center for your shop.
Even if you never post on your Facebook Page, this technical link is non-negotiable.
Here’s why it’s so critical:
Central Hub: It lets you manage your inventory, see your sales data, and handle customer messages all from one place (Commerce Manager).
Powerful Ads: This connection is essential for running effective ad campaigns, especially for retargeting people who have already viewed your products.
Verified Presence: It establishes your business as a single, verified entity across both platforms, which builds a ton of trust with potential buyers.
Finally, you need to own a website domain that you can verify with Meta. This proves you’re a legitimate business and not some fly-by-night operation. Verifying your domain is also a prerequisite for unlocking more advanced features like Checkout on Instagram.
Ultimately, these setup steps aren't just hoops to jump through. They're about creating a credible and smooth shopping experience for your customers, which is a fundamental part of good website conversion optimization.
Alright, with your accounts set up and ready to go, it's time to bridge the gap between your store and your Instagram profile. This is where we get your products showing up on the 'gram by creating and connecting a product catalog.
Think of this catalog as the digital inventory for your new storefront. It’s what powers every shoppable post, story, and Reel.
You’ve got two main ways to tackle this, and it really just depends on your e-commerce platform. If you’re one of the millions of DTC brands on Shopify, the process is a breeze. For everyone else, you'll be working directly inside Meta's Commerce Manager.
The Easy Route: Using the Shopify App
If your store is built on Shopify, you’re in for a treat. Shopify’s native Facebook & Instagram app is built specifically to connect your store to Meta's entire shopping ecosystem. It's designed to create a single source of truth for your inventory, which, trust me, is a lifesaver.
Once you install and set up this app, it automatically syncs your Shopify products—either your entire catalog or just specific collections you select—over to your Commerce Manager account. It’s that simple.
Here’s why this is the method I recommend for any Shopify seller:
Real-Time Inventory Sync: When a product sells out on your website, it's immediately marked as "out of stock" on Instagram. This single feature prevents countless customer service headaches.
Automatic Product Updates: Change a price, update a product photo, or tweak a description in Shopify? The app pushes those changes to your Instagram Shop automatically.
One Place to Manage Everything: You get to live in your Shopify dashboard. No more jumping between platforms to make the same update in two different places.
For busy founders or small marketing teams, this integration is a non-negotiable. It cuts out the mind-numbing manual work of keeping product lists in sync, which is where most errors and customer frustrations begin.
The Manual Method: Working in Commerce Manager
What if you're not on Shopify? Don't worry, you're not out of luck. Platforms like BigCommerce or WooCommerce have similar integrations you can use. But if you have a custom-coded site or use a platform without a direct connection, you'll be getting friendly with Commerce Manager.
This approach means you'll need to create a data feed. In simple terms, this is just a spreadsheet (usually a CSV, TSV, or XML file) that lists all your product info in a very specific format that Meta can understand.
A clean data feed is the absolute foundation of a healthy, manually managed shop. I've seen countless sync errors that trace back to simple formatting mistakes—things like using the wrong currency code or a broken image link. Always double-check your columns before that first upload.
You can upload this file by hand every time you make a change, but that gets old fast. The smarter, more scalable way is to set up a scheduled feed. You give Commerce Manager a URL where your product file is hosted, and it will automatically pull the updated file on a schedule you set—hourly, daily, or weekly.
No matter which path you take, the end goal is the same: get a complete, accurate, and up-to-date product catalog into Commerce Manager. This catalog is the engine that runs your entire Instagram Shopping experience, from tagging products in a post to building curated collections. A clean catalog from day one means a smooth experience for your customers and far fewer technical headaches for you down the road.
Configuring Your Shop and Navigating the Approval Process
So, you’ve got your product catalog synced up. Now for the fun part—this is where your shop really starts to take shape. We're going to dive into Facebook Commerce Manager to dial in the core settings, make some key decisions about the customer experience, and finally, submit it all for review.
Getting these details right from the get-go is the difference between a quick approval and getting stuck in review limbo.
Selecting Your Checkout Method
First things first, you have to decide how you want people to pay you. This is a bigger decision than it seems, as it directly impacts your user experience and data collection. You have two main paths to choose from.
The classic approach is to send customers to your website to finish the purchase. When someone finds a product they love, they'll tap "View on Website" and land directly on that product page in your store. This has been the standard for years and is still a fantastic option for many businesses.
The other route, if you're an eligible U.S.-based business, is Checkout on Instagram. This is Meta's native solution, allowing customers to buy your products with just a few taps, all without ever leaving the Instagram app. It's designed for a lightning-fast, frictionless experience.
So, which one is for you? Let's break down the trade-offs.
Feature | Checkout on Website | Checkout on Instagram |
|---|---|---|
User Experience | Adds an extra step, which can sometimes lead to drop-off. | Seamless and fast, designed to capture impulse buys and maximize conversions. |
Customer Data | You capture all customer data directly for email lists and retargeting. | Meta handles the initial data; you receive the necessary fulfillment info. |
Fees | You only pay your standard payment processor fees (like from Shopify Payments). | You pay a selling fee to Meta (5% per shipment, or a flat fee of $0.40 for shipments under $8.00). |
Trust | Customers transact on your own branded site, reinforcing your brand. | Leverages Meta's secure payment system, which millions of users already trust. |
My take? If your top priority is building your email list and owning the entire customer journey, sending traffic to your own site is the way to go. But if your main goal is to reduce friction and convert as many impulse shoppers as possible, the native Checkout on Instagram is incredibly powerful. You can always change this later, so don't overthink it—just pick the one that aligns with your current goal.
Customizing Your Shop and Creating Collections
With your checkout method selected, it's time to merchandise your digital storefront. Think of your Instagram Shop tab as your brand's front door; you want it to be inviting, on-brand, and incredibly easy to browse.
Inside Commerce Manager, you can start customizing the look and feel. You can adjust the layout, tweak button colors, and spotlight specific products or collections. This is your chance to make a killer first impression on anyone who visits your shop from your profile.
Collections are your secret weapon here. Instead of just showing a massive grid of every product you sell, collections let you curate and tell a story. They guide shoppers and help them discover products they might have otherwise missed.
Here are a few ideas for collections that I’ve seen work really well:
New Arrivals: This is a must-have. It gives your loyal followers a reason to keep coming back to see what's new.
Best Sellers: Leverage social proof! Showcasing your most popular products builds immediate trust and helps new customers make a decision.
Themed Collections: Get creative here. You could group items by season ("The Fall Cozy Collection"), by purpose ("WFH Essentials"), or by style ("The Minimalist Edit").
Gift Guides: Make shopping easy by curating products by price point ("Gifts Under $50") or for a specific person ("Gifts for Dad").
You can drag and drop your collections to change their order on your shop's homepage. I always tell my clients to put "New Arrivals" or "Best Sellers" right at the top. It immediately grabs attention with what’s fresh or already popular.
Submitting for Review and Handling Approval
Once your shop is customized and your first collections are in place, it's time for the final step: submitting your account for review. Meta’s team will go through everything to make sure your shop complies with their official Commerce Policies.
They're essentially checking for a few key signals:
Trustworthiness: Does your profile look like a real, established business? An active feed and a complete bio go a long way.
Accuracy: Is your business name, location, and contact information clear and consistent across platforms?
Policy Compliance: Do your products and your website follow all of Meta's rules? (No prohibited items, no misleading claims, etc.)
The review usually takes a few business days, but I've seen it take up to two weeks during busy periods. If your shop isn't approved on the first try, don't panic—it happens. Meta will give you a reason for the rejection. Read their feedback carefully, fix whatever issue they flagged, and then request another review. Getting through this approval process is the final hurdle to getting your Instagram Shop live and running.
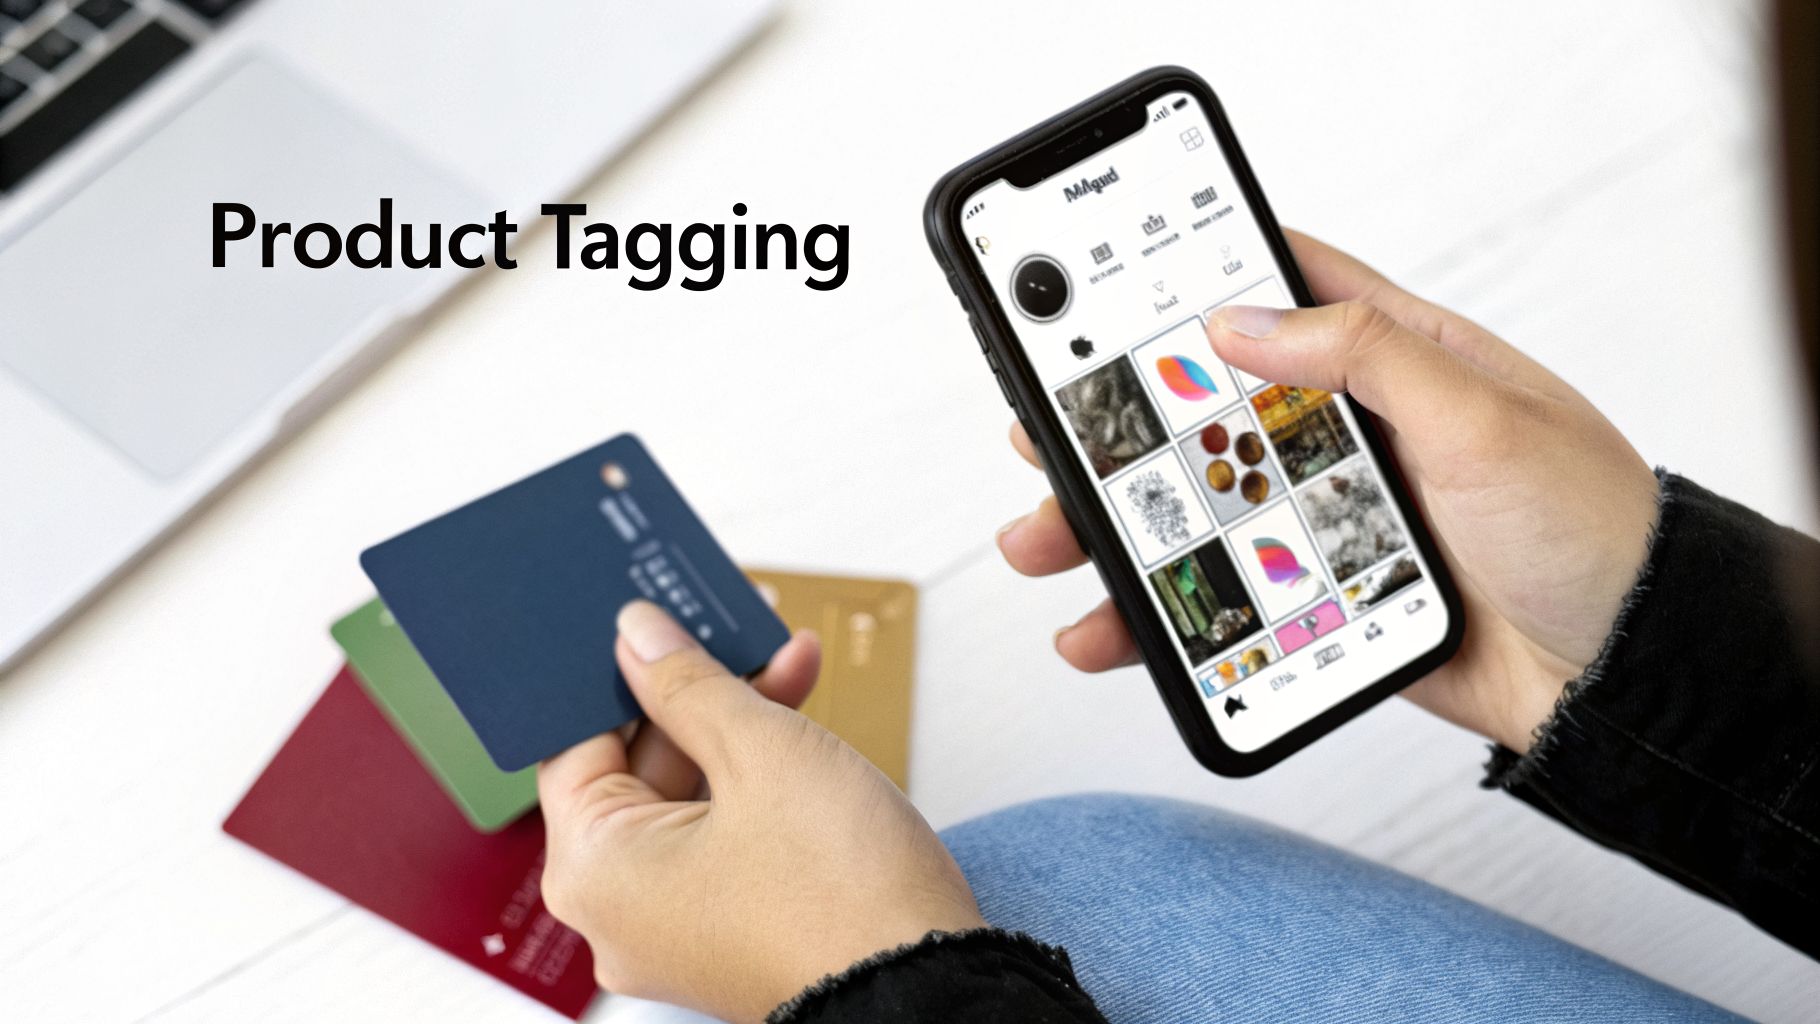
Turning Your Content into a Sales Engine with Product Tagging
Alright, your shop is officially approved and you've got your first collections organized. Now for the fun part: turning your everyday content into a consistent source of sales. This is where we go from simply having a shop to making it work for you, integrating your products right into the creative you’re already making.
The key to all of this is product tagging. It’s that little shopping bag icon you see on posts that lets people tap to see product details and buy. When you get this right, your profile stops being just a gallery and becomes a living, breathing storefront.
Weave Shopping into Every Corner of Instagram
Product tags are no longer just for your main feed posts. To really get the most out of your shop, you need to be tagging products across every format Instagram gives you. Each one hits a potential customer in a different way.
Here’s a breakdown of how to think about each placement:
Shoppable Feed Posts: This is your bread and butter. Tagging products in your beautiful lifestyle shots or flat lays creates a permanent piece of shoppable content. People can discover these posts for weeks or even months to come.
Shoppable Stories: Stories are perfect for driving urgency. That "Product" sticker is your best friend for new drops, flash sales, or limited-stock alerts. Their 24-hour lifespan creates a natural "get it now" feeling.
Shoppable Reels: Think of Reels as your discovery engine. This is your chance to entertain or educate while showing your products in action. Tagging a product in a viral-worthy Reel captures interest at its absolute peak.
Instagram Live Shopping: Nothing beats the interaction of a live sale. You can pin a product to the bottom of your screen while you demo it, answer audience questions in real-time, and drive sales on the spot. It’s a game-changer for product launches.
By using this multi-format strategy, you ensure that wherever a customer finds you—whether it's scrolling the Explore page or watching a Reel a friend sent them—a path to purchase is always just a tap away.
Smart Tagging: Best Practices for Driving Clicks
Just plastering tags everywhere isn't the goal. You have to be strategic to avoid looking spammy and to actually get people to click. It’s a delicate balance.
When it comes to how many tags to use, I’ve found that less is often more. For a single photo, tagging one to three hero products keeps things clean and focused. If you tag every single item in a busy scene, you just create visual noise and decision paralysis for the shopper.
Key Insight: Don't just tag products; tell a story around them. Your caption is just as important as the tag itself. Explain why you're featuring that specific item, what problem it solves, or what makes it special. Context is what converts a casual scroll into a click.
Imagine a home decor brand posting a photo of a cozy living room. Instead of tagging all 15 items, they could highlight just two: the "Artisan-Woven Throw Blanket" and the "Hand-Poured Soy Candle." The caption can then paint a picture of creating the perfect relaxing evening, naturally guiding the eye to those tagged products. It's so much more effective.
Measuring What Matters
To know if your tagging strategy is working, you need to track the right metrics for each content type. What works for a Reel won't have the same success metrics as a static post.
Here’s a quick guide to help you focus your analytics efforts.
Instagram Shopping Content Performance Metrics
Content Type | Primary Metric | Secondary Metric | Optimization Goal |
|---|---|---|---|
Feed Posts | Product Page Views | Reach, Engagement Rate | Drive targeted traffic to specific PDPs. |
Stories | Sticker Taps | Outbound Clicks | Generate immediate interest and clicks for timely offers. |
Reels | Product Tag Taps | Shares, Saves | Capture top-of-funnel interest from a broad audience. |
Live Shopping | Products Pinned | Adds to Cart, Sales | Convert engaged viewers into immediate buyers. |
By keeping an eye on these specific numbers, you can quickly see what's resonating and double down on it, rather than just looking at vanity metrics like likes.
The ultimate aim is to make shopping feel like a seamless part of the experience your followers already enjoy. When you successfully close the gap between inspiration and purchase, you not only improve your sales but also how to improve click-through rate across the board.
Think of it this way: every post, Story, and Reel becomes another door into your store. By tagging thoughtfully and consistently, your Instagram profile transforms into a powerful sales channel that's working for you 24/7.
From Setup to Scale: Using Ads to Grow Your Instagram Shop
Getting your Instagram Shop live is a huge win, but let’s be honest—the real work starts now. The goal isn't just to have a shop; it's to turn it into a reliable source of revenue. This is where you graduate from setup to strategy, using data and a bit of ad spend to seriously amplify your sales.
Think of it as building a sales machine right inside the Instagram app. Your organic shop activity provides the fuel, and paid ads are the engine that drives predictable growth.
Let Your Data Point the Way
Before you even think about putting money behind an ad, you need to become a student of your own data. Your best insights are waiting for you inside Commerce Manager. This is where you get to see exactly what your audience is clicking on and what they’re ignoring.
Dive into metrics like Product Page Views and Adds to Cart. Think of these numbers as votes from your audience. Is a specific product getting tons of views but almost no one is buying? That could signal an issue with your price, photos, or description. On the flip side, a product with a killer view-to-cart ratio is a certified hit.
Expert Tip: Your top-performing organic products are the low-hanging fruit for your first ad campaigns. You already have proof that they resonate with people, which dramatically lowers your risk and boosts your chances of seeing a great return on ad spend (ROAS).
When you follow the data, you stop guessing what to promote and start making smart, informed decisions.
Turn Your Best Posts into Ads with Product Tags
The easiest and often most effective way to start advertising is to simply create ads with product tags. This lets you take your most popular organic posts—the ones people are already loving—and transform them into powerful, shoppable ads.
It's like strapping a rocket to your best content. You take a post that already has social proof (likes, comments, and saves) and get it in front of a much bigger, highly targeted audience.
The reason this works so well is that it feels natural. For someone scrolling their feed, it doesn't look like a jarring ad. It just looks like another great post from a cool brand, but with the bonus of being able to tap and shop right from the image.
Recover Lost Sales with Catalog-Based Retargeting
Okay, this is where things get really powerful. By linking your product catalog to your ad account, you unlock the secret weapon of DTC advertising: Dynamic Product Ads (DPAs).
Picture this:
A potential customer is scrolling Instagram, sees your shop, and taps on a gorgeous blue sweater.
They check it out but get distracted by a text message and close the app. Sale lost, right?
Not so fast. Later that day, they're back on Instagram, and an ad pops up in their feed featuring that exact same blue sweater.
That's not a coincidence; that's a DPA at work. These ads automatically retarget people with the specific products they've already viewed or added to their cart. They are incredibly personal, timely, and one of the most effective ways to bring shoppers back to complete their purchase.
DPAs consistently deliver some of the highest ROAS you'll see because they target shoppers with clear intent. You're not trying to convince a stranger; you're just reminding a warm lead about something they already wanted.
Find New Customers with Advanced Targeting
Once your retargeting machine is running, it's time to go hunting for new customers. The data from your Instagram Shop is the perfect place to start.
You can build Custom Audiences from users who have taken high-intent actions, like:
People who viewed a product in your shop
People who added an item to their cart
People who actually bought something from you
This is your "best customer" profile. From here, you can create a Lookalike Audience. Meta’s algorithm will analyze the traits of your best customers and find new people who look just like them. It’s the smartest way to scale your customer acquisition.
As your shop gathers more data, your Lookalike Audiences become even more accurate, creating a powerful growth loop. This works best when you’re tracking customer actions effectively, a topic we cover in our guide to the Meta Conversions API.
Common Questions About Instagram Shopping
Setting up an Instagram Shop for the first time can feel like you're navigating a maze. It’s completely normal to hit a few snags. Let's walk through some of the most common questions and sticking points I see brands deal with so you can get your shop live and selling.
How Long Does Instagram Shop Approval Take?
This is the big one. Everyone wants to know how long they’ll be waiting. The honest answer? It really depends. Most of the time, I see accounts get reviewed within a few business days. But don't be surprised if it takes up to two weeks, especially if Meta's team needs to do a deeper dive into your account or products for compliance.
Want to get through the queue faster? The trick is to have all your ducks in a row before you hit submit.
Get your domain verified in Business Manager first.
Double-check that every single product in your catalog lines up with Meta's Commerce Policies.
Make sure your business name, address, and website are identical everywhere. Consistency is key.
Getting these details right from the start is the best way to avoid a rejection, which is almost always what causes those long, frustrating delays.
Can I Sell on Instagram Without a Website?
This is a bit of a "yes, but" situation. You absolutely have to own and verify a business domain—it's how Meta confirms you're a legitimate business. However, you don't necessarily need customers to visit a traditional website to buy from you.
By using the Checkout on Instagram feature, your customers can go from discovery to purchase all within the app. It's the closest you can get to selling directly on Instagram without a full-blown e-commerce store. That said, a platform like Shopify usually still acts as the command center for your product catalog and inventory, even if the customer never sees it.
A common misconception is that "Checkout on Instagram" means you can ditch your website entirely. You still need that verified domain and a backend to manage your products; the feature just makes the final purchase step incredibly smooth for the customer.
Why Are My Products Not Showing Up in My Shop?
It’s incredibly frustrating when your shop gets approved, but your products are nowhere to be found. If this happens, don't panic. Here’s the troubleshooting checklist I run through.
First, head straight to Commerce Manager. Look for any sync errors or policy violations at the product level. It's very common for individual products to be flagged for small issues (like a weak description or a non-compliant image) even when the shop itself is approved.
Next, confirm you’ve linked the correct product set from your catalog to your Instagram profile. Sometimes, the problem is just a simple lag, and it can take a few hours for new products to appear. If you've waited and they're still missing, try going back to your e-commerce platform (like Shopify) and manually re-syncing the catalog to force an update.
What Are the Fees for Checkout on Instagram?
When a customer buys directly through your shop using Checkout on Instagram, Meta takes a selling fee. For 2026, that fee is 5% per shipment. If the shipment is less than $8.00, it's a flat fee of $0.40.
This fee isn't just for processing the payment. It also covers things like fraud protection and the secure transaction technology that gives customers peace of mind. If you opt to send shoppers to your own website to check out, you won't pay this Meta fee, but your standard payment processor fees (from Shopify Payments, Stripe, etc.) will still apply.
Instead of wrestling with noisy ad data, let SpendOwlAI give you a clear, ranked list of actions to take. Our system analyzes your performance, flags risks, and tells you exactly which budgets, creatives, and audiences need your attention today. Stop guessing and start executing with confidence by visiting https://spendowlai.com.